Neovim AI 插件配置指南

随着 AI 辅助编程的发展,从最开始的 AI Completion 自动补全代码,到 AI chat 通过对话分析代码,再到现在的 AI Agent 自动修改项目,自动化程度越来越高。市面上也出现了非常多的 AI 开发工具,如 cursor 等。但作为一个 vimer,自然忍受不了多个工具互相切换对开发思路的打断。在清明节假期花了几天折腾了一下 neovim 的 AI 开发环境。

配置过程

首先需要需要明确 AI 目前可以协助我们的三个方面,分别是补全(completion)、对话(chat)、代理(agent)。因此 neovim 的 AI 环境搭建也主要从这三个方面入手。

AI Completion

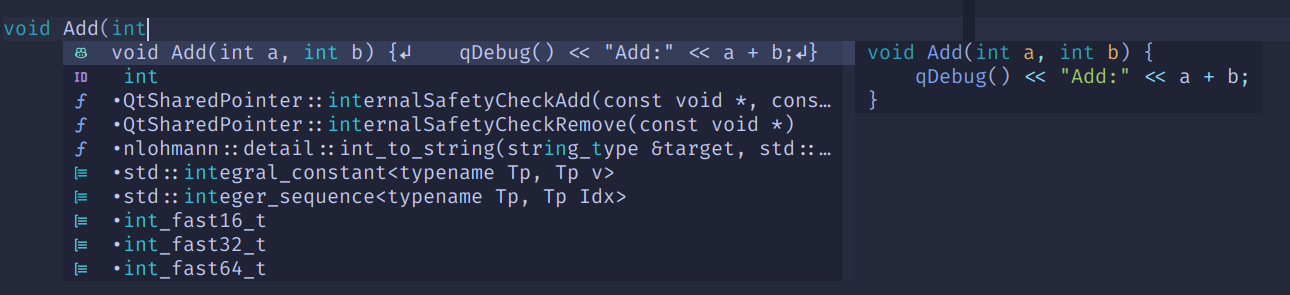
对于代码补全,在 Github 刚推出 Copilot 时就通过 Github 官方开发的插件 copilot.vim 使用上了,该插件是 Github 特地请 vim 大佬 Tim Pope 开发的,使用体验非常不错。但随着 Github Copilot 功能的不断发展,该插件并没有得到更进一步的更新,使用的模型依旧是 ChatGPT-3.5,相对已经比较落后了,而且该插件几乎没有可以定制的参数。neovim 社区基于该插件,使用 lua 开发了一个对等的插件 copilot.lua,并提供了相当多的定制选项,例如可以切换大模型为 ChatGPT-4o(Github Copilot 暂时仅支持 3 和 4o 作为补全模型)。

同时为了查看 Copilot 补全状态,添加了 lualine 的对应插件用于在状态栏显示当前状态。

以下是对应的配置:

1
2
3
4
5
6
7
8
9
10
11
12
13
14
15
16
17
18
19
{
"zbirenbaum/copilot.lua",
cmd = "Copilot",
event = "InsertEnter",
opts = {
copilot_model = "gpt-4o-copilot",
suggestion = { enabled = false, auto_trigger = true },
panel = { enabled = false },
},
config = true,
},
{
"AndreM222/copilot-lualine",
config = function()
current = require("lualine").get_config()
table.insert(current.sections.lualine_x, 1, "copilot")
require("lualine").setup(current)
end,
},

使用方式极其简单,只需要正常编写代码,该插件会自动将补全内容显示在补全插件中(这里使用的是 blink),若想实现和 copilot.vim 一样的效果,直接将配置中的 suggestion.enabled 修改为 true 即可。

AI补全

AI Chat

AI Chat 用于通过对话进行代码分析,生成等。这里对比了支持 Github Copilot 的对话插件:

插件 主页 优点 缺点
CopilotChat.nvim https://github.com/CopilotC-Nvim/CopilotChat.nvim 配置简单 仅支持 Github Copilot
codecompanion.nvim https://github.com/olimorris/codecompanion.nvim 支持多个大模型提供商 配置复杂

由于目前仅有 Github Copilot 的企业账号,因此这里选择了 CopilotChat.nvim。由于 Github Copilot 也提供了不同的大模型后端支持,因此缺点相对而言也可以接受。其配置如下:

1
2
3
4
5
6
7
8
9
10
11
12
13
14
15
16
17
18
19
20
21
22
23
24
25
26
27
28
29
30
31
32
33
34
35
36
37
38
39
40
41
42
43
44
45
46
47
48
49
{
"CopilotC-Nvim/CopilotChat.nvim",
config = function()
local copilot_chat = require("CopilotChat")
anwser_in_chinese = "Please anwser all questions in Chinese"
local copilot_instructions = require("CopilotChat.config.prompts").COPILOT_INSTRUCTIONS.system_prompt
.. anwser_in_chinese
local copilot_explain = require("CopilotChat.config.prompts").COPILOT_EXPLAIN.system_prompt
.. anwser_in_chinese
local copilot_review = require("CopilotChat.config.prompts").COPILOT_REVIEW.system_prompt
.. anwser_in_chinese
copilot_chat.setup({
show_help = "yes", -- Show help text for CopilotChatInPlace, default: yes
debug = false, -- Enable or disable debug mode, the log file will be in ~/.local/state/nvim/CopilotChat.nvim.log
disable_extra_info = "no", -- Disable extra information (e.g: system prompt) in the response.
model = "gemini-2.0-flash-001",
vim.print(),
system_prompt = copilot_instructions,
prompts = {
Explain = { prompt = "解释选中的代码", system_prompt = copilot_explain },
Review = { prompt = "审查选中的代码", system_prompt = copilot_review },
Fix = "这代代码中存在一个问题,请重写这段代码以修复bug",
Optimize = "请优化选中的代码",
Docs = "请以Doxygen格式为我的代码生成面向开发者的文档,注释以中文编写",
Tests = "请为我的代码生成测试",
FixDiagnostic = "请帮助解决以下文件中的诊断问题:",
Commit = "请写一个符合 commitizen 约定的提交信息。确保标题最多 50 个字符,消息在 72 个字符处换行。将整个消息用 gitcommit 语言包装在代码块中。",
CommitStaged = "请写一个符合 commitizen 约定的提交信息。确保标题最多 50 个字符,消息在 72 个字符处换行。将整个消息用 gitcommit 语言包装在代码块中。",
},
})
end,
build = function()
vim.notify("Please update the remote plugins by running ':UpdateRemotePlugins', then restart Neovim.")
end,
event = "VeryLazy",
},
{
"folke/edgy.nvim",
event = "VeryLazy",
opts = {
right = {
{
title = "CopilotChat.nvim", -- Title of the window
ft = "copilot-chat", -- This is custom file type from CopilotChat.nvim
size = { width = 0.4 }, -- Width of the window
},
},
},
},

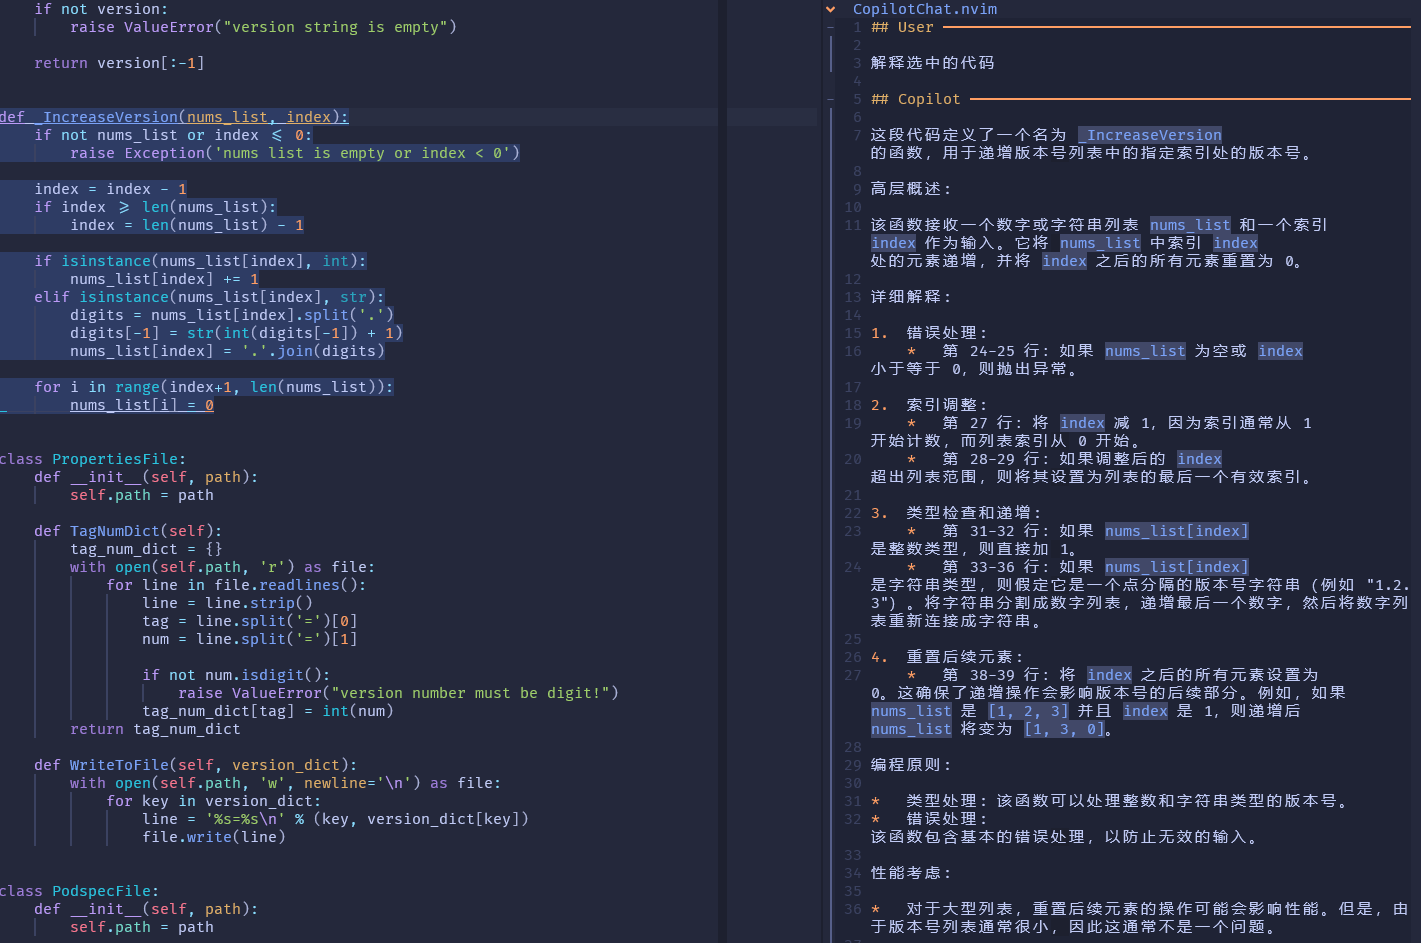
这里为了使用中文对话,通过在 全局prompt 中插入使用中文回答的要求。我们可以在普通模式对当前整个 buffer 或选择模式下对选中内容,通过 CopilotChat 命令进入 Chat 界面:

Chat界面

我们可以通过 CopilotChatModels 命令来切换使用的大模型:

切换模型

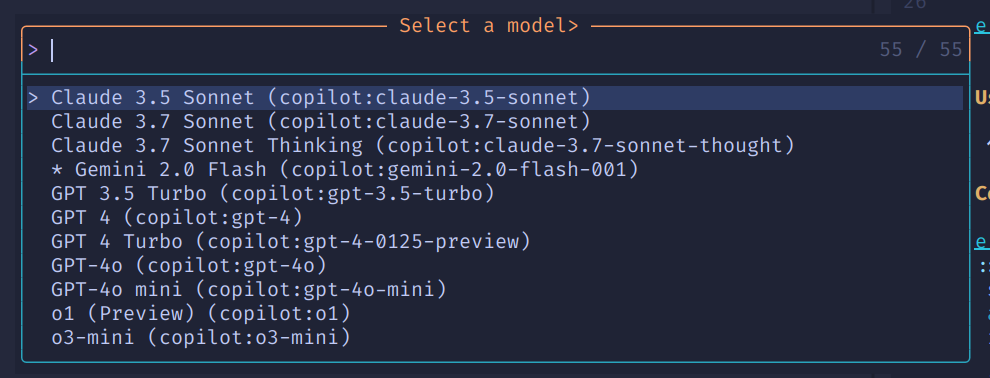
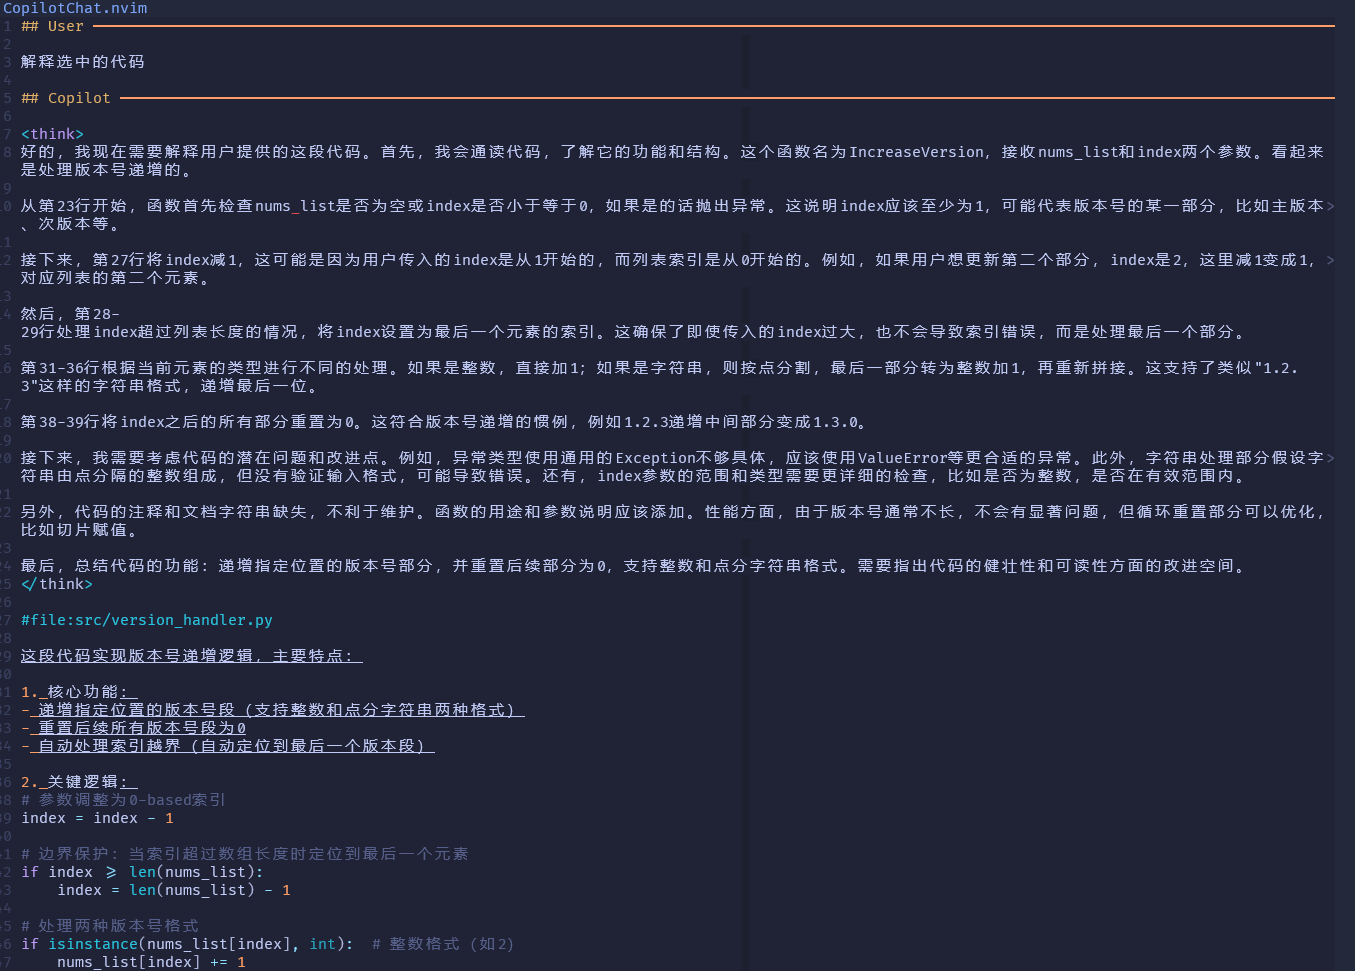
只要是 Github Copilot Markplace(https://github.com/marketplace?type=apps&copilot_app=true) 支持的大模型,我们都可以随时切换使用。我们可以参考 Github Copilot 官方说明合理选择,具体参考官方文档。如切换到 Deepseek R1 模型后的回答:

Deepseek回答

该插件在最新版本中也提供了 AI Agent 能力,但使用起来相对较为麻烦,因此暂时仅作为 AI Chat 插件使用。

AI Agent

最后就是最为重磅的 AI Agent 能力。AI Completion 和 AI Chat 通常还是基于局部代码进行代码处理,而 AI Agent,搭配 MCP 可以使用整个项目工程上下文,进行软件开发相关的各项操作,例如初始化工程,编写提交信息并提交代码等。支持 AI Agent 的 nvim 插件并不多,这里选择了使用量比较多的 avante.nvim,这也是一个国人开发的插件,带有中文说明。我们可以基于该插件实现类似于 cursor 的体验。配置如下:

1
2
3
4
5
6
7
8
9
10
11
12
13
14
15
16
17
18
19
20
21
22
23
24
25
26
27
28
29
{
"yetone/avante.nvim",
event = "VeryLazy",
opts = {
provider = "copilot",
copilot = {
endpoint = "https://api.githubcopilot.com",
model = "claude-3.5-sonnet",
proxy = nil, -- [protocol://]host[:port] Use this proxy
allow_insecure = false, -- Allow insecure server connections
timeout = 30000, -- Timeout in milliseconds
temperature = 0,
max_tokens = 20480,
},
},
build = vim.fn.has("win32") == 1
and "powershell -ExecutionPolicy Bypass -File Build.ps1 -BuildFromSource false"
or "make",
dependencies = {
"nvim-treesitter/nvim-treesitter",
"stevearc/dressing.nvim",
"nvim-lua/plenary.nvim",
"MunifTanjim/nui.nvim",
"echasnovski/mini.pick",
"nvim-telescope/telescope.nvim", -- 用于文件选择器提供者 telescope
"nvim-tree/nvim-web-devicons", -- 或 echasnovski/mini.icons
"zbirenbaum/copilot.lua",
},
},

该插件还提供了非常多的各种配置,可以根据自己的需求进行配置。我们这里直接使用了 Github Copilot 作为提供者,我们也可以自行购买 Claude、OpenAI 等厂商的服务,并配置相关 API key 来使用。考虑到 Copilot 提供的模型当前除了 Gemini 2.5 没有提供,其他基本都有,已经足够使用,且是企业账号,不用担心使用次数限制,因此这里继续使用 Copilot 接口。模型方面我们选择 claude-3.5-sonnet,3.7 速度相对较慢。

Agent界面

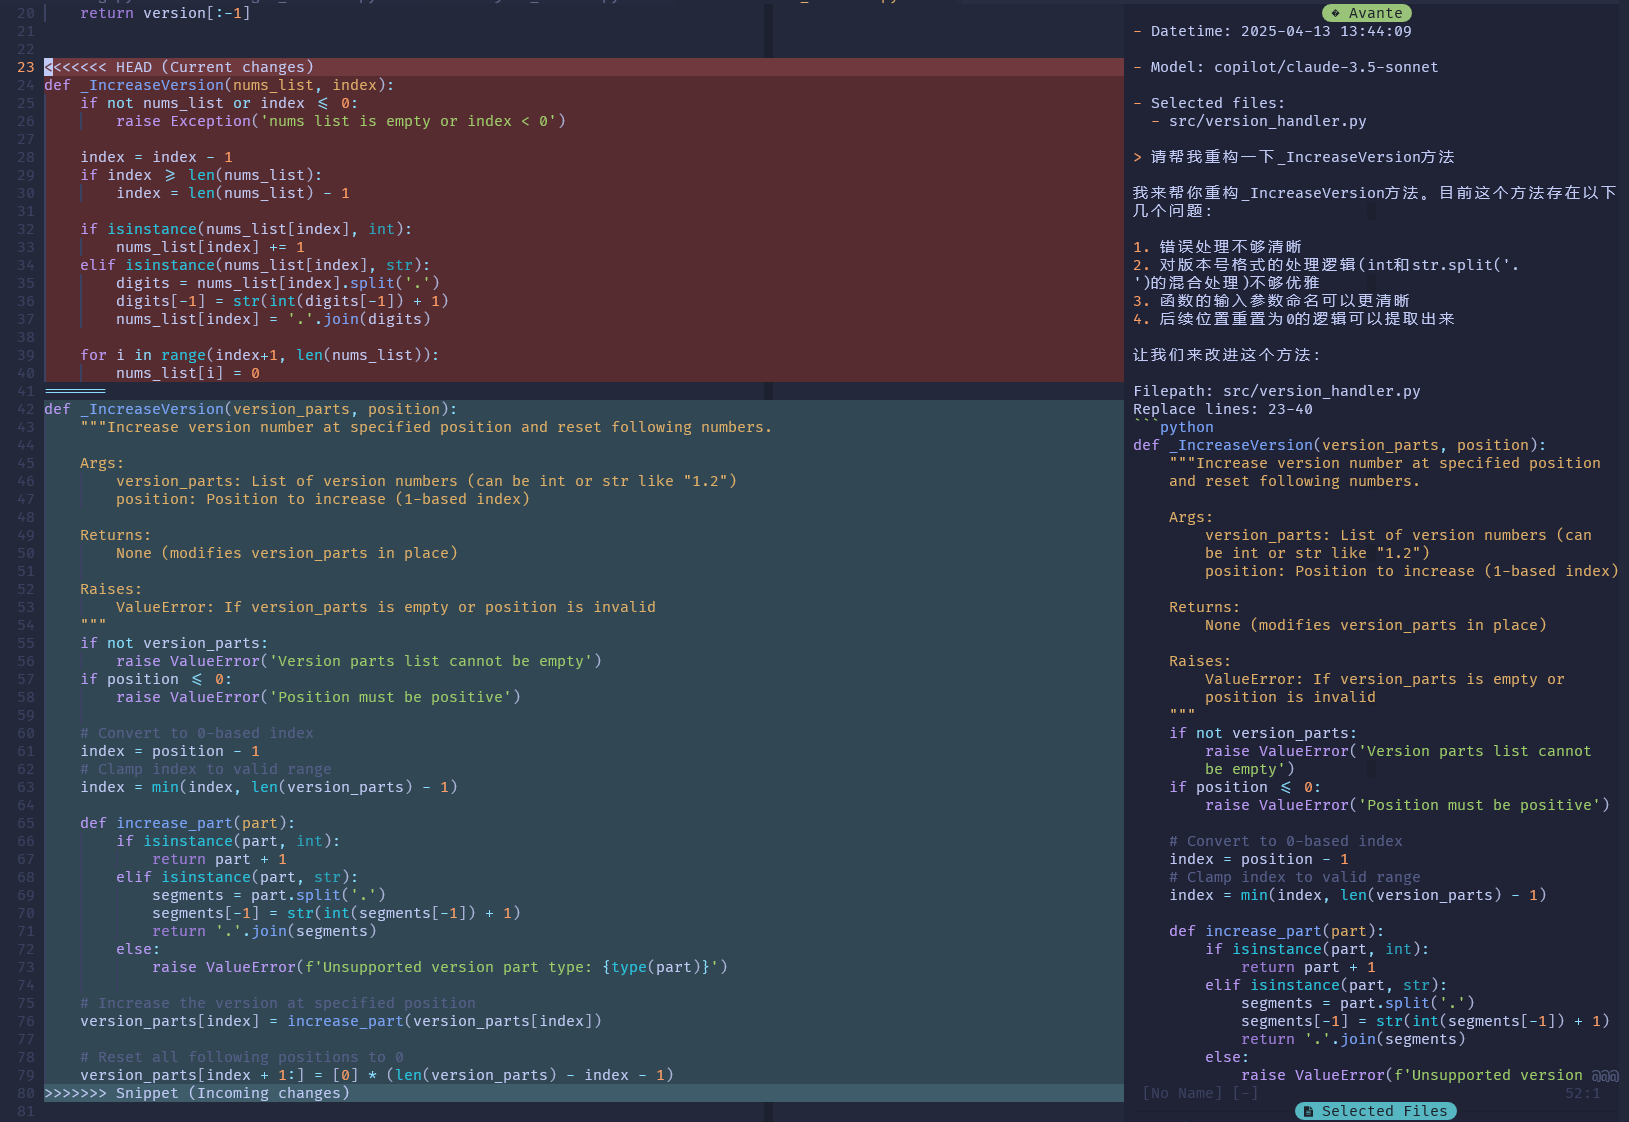
使用效果如图所示。对于复杂需求,我们需要注意添加合适的文件作为上下文,否则其可能会无法完全理解我们的意思。

我们还可以用来生成 Git commit 并提交,该插件支持 MCP,可以自动选择对应工具进行调用:

Commit提交

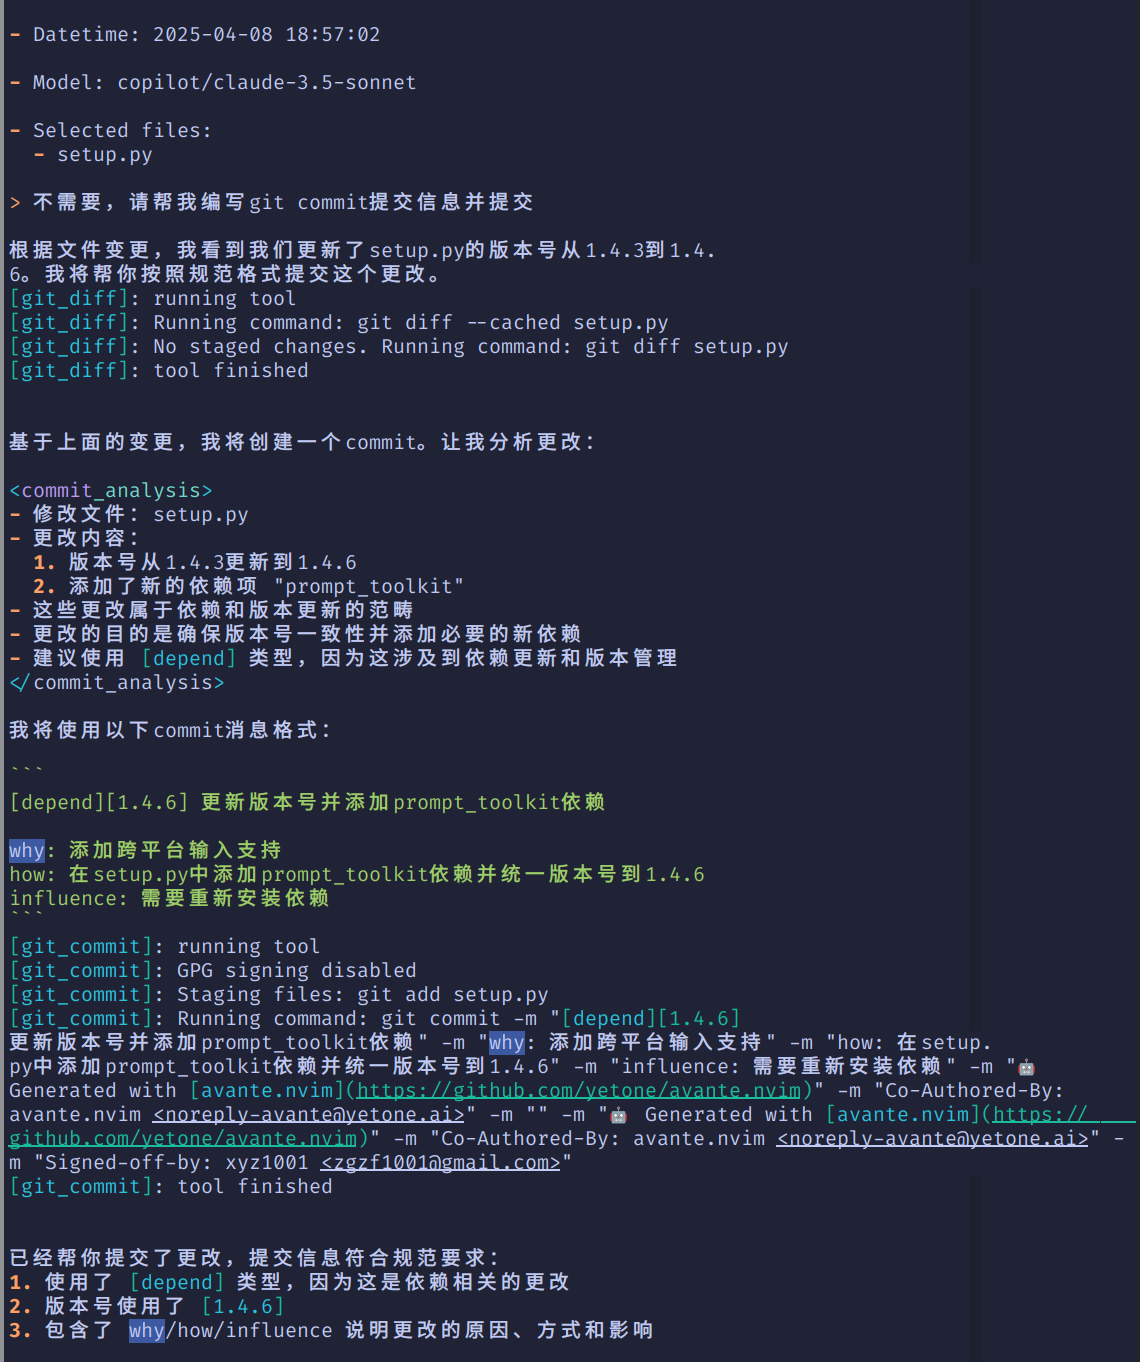
可以看到,avante 调用了 git_diff 和 git_commit 工具实现了代码对比和代码提交的功能。

对比

在添加以上几个插件后,我们就基本支持了目前主流的 AI 辅助开发的全部能力。以下是和 Cursor 的个人使用体验对比:

优点 缺点
neovim+Copilot+CopilotChat+avant 1. 不用单独购买 Cursor,直接一个 Github Copilot 账号搞定
2. 多种大模型随意切换
3. 开发环境统一,对开发打断较少
1. AI Agent 速度较慢,可能和网络有关
2. 有一定的使用门槛
cursor 1. 速度较快
2. 上手较快
1. 需要额外付费购买,购买后依然有数量限制
2. Agent 功能不支持接入自行购买的其他大模型 API key
3. 可能需要在多个 IDE 间来回切换
4. 对于 C/C++ 开发,vscode 的核心 C++ 扩展已不允许在非官方 vscode 上使用(参考),无法直接用来开发 C++ 项目

总结

插件 大模型
AI Completion zbirenbaum/copilot.lua gpt-4o-copilot
AI Chat CopilotChat.nvim gemini-2.0-flash-001
AI Agent yetone/avante.nvim claude-3.5-sonnet

完整的配置可参考我的 dotfiles